How to use interrupts - ESP32
- automatelabonline
- Mar 24
- 2 min read

Interrupts allow the microcontroller to interrupt the normal execution of its code to respond to external or internal events quickly and accurately, without having to constantly check the status of an event. This event-driven approach to programming is essential for creating more efficient and responsive systems.
ESP32 interrupts are often used in applications that require real-time or immediate responses, such as rpm measurement systems, sensor readings with millimeter precision, communication projects where synchronization is crucial, or even simple button readings. They allow ESP32 to perform tasks in the background while maintaining the processing of other functions, which makes the system more agile and capable of handling multiple demands simultaneously.
Functions for Interrupts
All ESP32 pins can be configured for interrupts. To create an interrupt, use the function:
attachInterrupt(PIN, FUNCTION, MODE);PIN represents the number of the GPIO used. FUNCTION is the name of a function created in the code, which will be executed whenever the interrupt occurs, and MODE represents the type of interrupt, there are the following possibilities:
LOW: interruption will occur when the pin is at a low logic level;
CHANGE: interrupt will occur when pin changes logic level;
FALLING: interruption will occur when the pin changes from high to low logic level;
RISING: interrupt will occur when pin changes from low to high logic level;
HIGH: interruption will occur when the pin is at a high logic level;
To disable interruptions, simply use the function:
detachInterrupt(PIN);Project - Creating Interrupts in ESP32
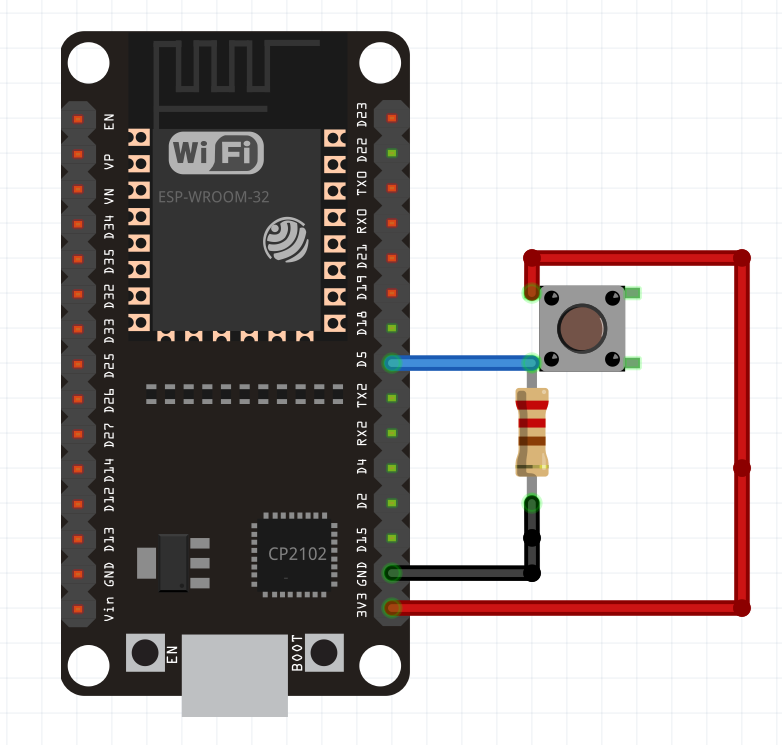
To better understand how interrupts work, let's make a simple project, where a button will trigger an interrupt. For this, the following circuit will be used:
Below is the project code:
#define interruptPin 5

void interrupt() {
  Serial.println("Button Pressed");
}

void setup() {
  Serial.begin(9600);
  pinMode(interruptPin, INPUT);
  attachInterrupt(interruptPin, interrupt, RISING);
}

void loop() {
  delay(100);
}
Understanding the Code
First, the interrupt() function is created, which will be called every time the button is pressed.
void interrupt() {
  Serial.println("Button Pressed");
}
Since this function will interrupt the code, it must execute quickly. Therefore, it is not recommended to use the println() function inside the interruption function. In this case, we will use it only for demonstration purposes. However, in real projects, this practice is not appropriate.
In the setup() function, the interrupt is configured on pin 5 using the RISING method and calling the interrupt() function. When analyzing the circuit, when the button is pressed, it causes pin 5 to have contact with 5V. That's why the RISING mode is used.
void setup() {
  Serial.begin(9600);
  pinMode(interruptPin, INPUT);
  attachInterrupt(digitalPinToInterrupt(interruptPin), interrupt, RISING);
}
With this code, every time the button is pressed, the ESP32 will write the message "Button pressed" to the serial monitor.
Conclusions
Interrupt functions in ESP32 are powerful features that allow developers to create more responsive and efficient systems, especially in projects that require constant monitoring of events and immediate response to stimuli.
However, the use of interrupts requires caution, especially in more complex projects where time control and resource management can be critical. It is essential to understand how interrupts work, their limitations, and how to integrate them correctly into the program flow to avoid problems such as synchronization failures and unwanted deadlocks.

Comments