How to Use an Ultrasonic Distance Sensor
- automatelabonline
- Mar 11, 2025
- 3 min read

Ultrasonic distance sensors have become an essential tool in various electronic projects and automated systems, thanks to their precision, simplicity and low cost. Integrated into microcontrollers, these sensors allow distances to be measured accurately by emitting sound waves that return to the sensor after reflecting off an object.
The use of ultrasonic sensors is widely applied in areas such as robotics, home automation, security and monitoring systems, offering efficient solutions for a series of needs.
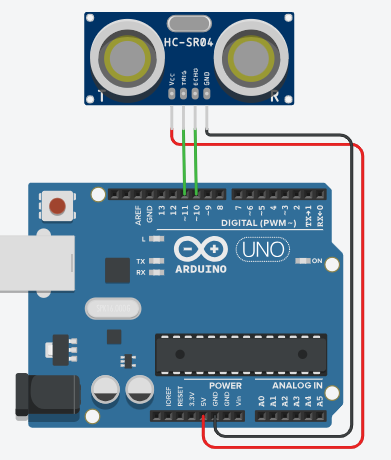
The most widely used ultrasonic sensor for microcontrollers is the HC-SR04, shown in the image below. This sensor has 4 pins: Vcc (power supply), GND, Trigger (which emits the sound wave) and Echo (which receives the return wave).

It is possible to find versions with only 3 pins, such as PING))). In this case, the Trigger and Echo pins are unified.
Understanding Ultrasonic Sensors
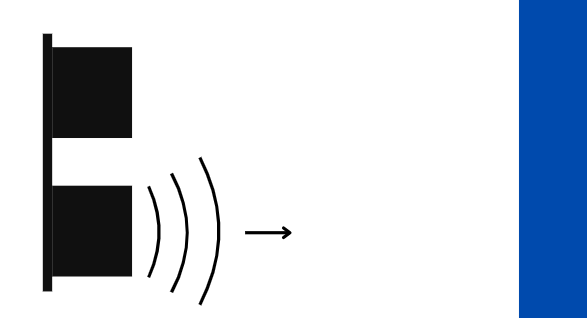
Ultrasonic sensors can calculate distances using sound. They emit ultrasonic frequencies that are not picked up by human ears (approximately 40kHz) and send a pulse to the microcontroller when this frequency returns. With this, depending on the time interval between the pulse being sent and returning, it is possible to calculate the distance of the object that is right in front of the sensor.
When the sound signal is sent, the microcontroller starts counting the time. This signal reflects off the objects in front of the sensor and returns to it. When it returns, an interrupt is triggered in the microcontroller, which then counts the total time and calculates the distance.
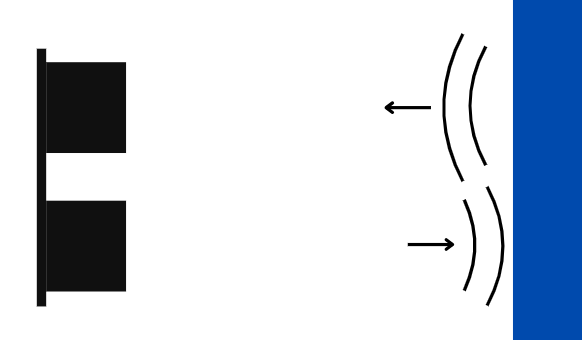

The speed of sound in air is approximately 343 m/s. In other words, for each second of interval, the sound can be considered to have traveled 343 meters. However, since the sound needs to travel to the object and return to the sensor, it travels this distance twice. Therefore, the formula for distance ( d ), based on time in milliseconds ( T ), is:

Project - Reading distance with an ultrasonic sensor
To read the ultrasonic sensor, we will use the Ultrasonic library, developed by Erick Simões. Its repository can be accessed through this link . To connect the sensor, simply connect the Vcc pin to 5V, GND to the Arduino GND pin, and the Trigger and Echo pins to two digital pins. In this case, pins 11 (Trigger) and 10 (Echo) were used.
If you are using the version with only 3 pins, simply connect the SIG pin to any digital port.
Below is the project code.
#include "Ultrasonic.h"

Ultrasonic ultrasonic(11, 10); // create an object

void setup() {
	Serial.begin(9600);
}

void loop() {
	int distance = ultrasonic.read(); // read the sensor in cm
	Serial.print(distance);
	Serial.println(" cm");
	delay(1000);
}
Understanding the Code
First, the Ultrasonic library is imported and an object of this class is created. The Trigger and Echo pins are passed as parameters, in that order. If you are using the version with only 3 pins, just inform the port to which the SIG pin is connected.
#include "Ultrasonic.h"

Ultrasonic ultrasonic(11, 10); // create an object
In the setup() function, the Serial is started. In the loop() function, the sensor is read every second and written to the serial monitor.
void loop() {
	int distance = ultrasonic.read(); // read the sensor in cm
	Serial.print(distance);
	Serial.println(" cm");
	delay(1000);
}
The default reading unit for the read() function is centimeters. You can change this by passing a parameter to the function. If you want to make it clear that the reading is in centimeters:
ultrasonic.read(CM);If it is in inches:
ultrasonic.read(INC);Conclusion
In conclusion, the use of ultrasonic sensors with microcontrollers has proven to be an effective and affordable solution for a variety of applications, from automation systems to distance measuring devices. The combination of these two components enables the creation of innovative and low-cost projects that can be implemented in areas such as robotics, security, home automation and autonomous vehicles.


Comments